For information on the latest technical updates and bug fixes, see here.
Getting started
How do I sign up to the WildTracker program?
Easy! Fill out an Expression of Interest form . We will get back to you with the next steps.
Who can sign up to become a WildTracker?
If you live in Tasmania, you can be a WildTracker. If you live on the Australian mainland but have a holiday home or other property in Tasmania, you are also welcome to join.
Under 18s will first need an adult to join WildTracker on their behalf and register a property. After which they can invite a child as a new user who is associated with that property.
How much does it cost to join WildTracker?
There are no sign-up costs or membership fees associated with participating in WildTracker.
It is important to note, though, that uploading/downloading content to wildtracker.com.au will consume internet data. You can check your personal data charges and allocation with your internet service provider.
If you would like to support the WildTracker program, you can donate here to help cover the costs of maintaining the website, storing and processing your photos.
I don’t have a camera trap, can I borrow one?
We’re currently only equipped to lend cameras to members of the Land for Wildlife program. However, we’re working on expanding this to include Gardens for Wildlife members in the future – watch this space.
If you’re eligible, you can pick up a WildTracker camera pack from one of our community hubs. Get in touch with us at wildtracker@tasland.org.au for further details.
For everyone who registers interest in participating in WildTracker, we also offer a discount code to help you purchase your own camera trap.
I’ve never seen any cool animals on my property, should I bother?
Yes. Definitely yes. Some animals are hardly ever seen in person because they are shy, cryptic (well hidden) or are only active at times when people are not. You may be surprised by what you find!
WildTracker is not purely about the “cool” animals anyway… Photos of rabbits, rats and pademelons are all helpful to improving our understanding of Tasmanian ecology. We ask that all photos with wildlife, whatever that might be, are uploaded to WildTracker.
My internet is terrible, should I bother?
A decent internet connection is required to upload camera images to WildTracker. If your connection is slow or interrupted during the upload, we can think of three potential workarounds:
- WildTracker allows you to reupload any images that were not successfully uploaded on the first attempt. Your survey will remain in Draft status until you click the Publish button, meaning you can edit this as needed by adding or removing photos. Refer to the how-to guide for further information.
- Visit your local library and give it another shot using their internet.
- Invite a friend or family member to your registered property and have them upload images on your behalf.
- Save your camera images onto an external hard drive or usb. The next time you are in civilisation you will be able to upload the data from multiple surveys, even if these were historical. Just keep note of the dates or ensure your camera date and time settings are always correct.
I’m technologically challenged, and this sounds scary…
We get it. There’s a lot to learn if you are new to camera traps, web apps, artificial intelligence and citizen science. Please don’t let that put you off though! Make use of the written how-to guide with step-by-step screen shots and this FAQ. If all else fails, you can attend one of our WildTracker or Land for Wildlife workshops and seek support from us in person, or we may be able to assign you a helpful volunteer.
If you have a specific technological question not answered here, contact wildtracker@tasland.org.au.
Can my kids get involved?
Yes of course. If you are happy to supervise and tag images with your under 18 then that is great. However, if a child is going to tag images on their own, we’d like them to use their own login. As an adult, you can invite children to your property through the add user function.
Camera traps – purchasing, settings and deployment
Is a camera trap the same thing as a trail camera?
Yes. Other names you might come across include wildlife camera, game camera, trophy camera, scout camera or motion-sensor camera.
How does a camera trap work exactly?
There are many kinds of camera trap out there, but they all work according to the same basic principles.
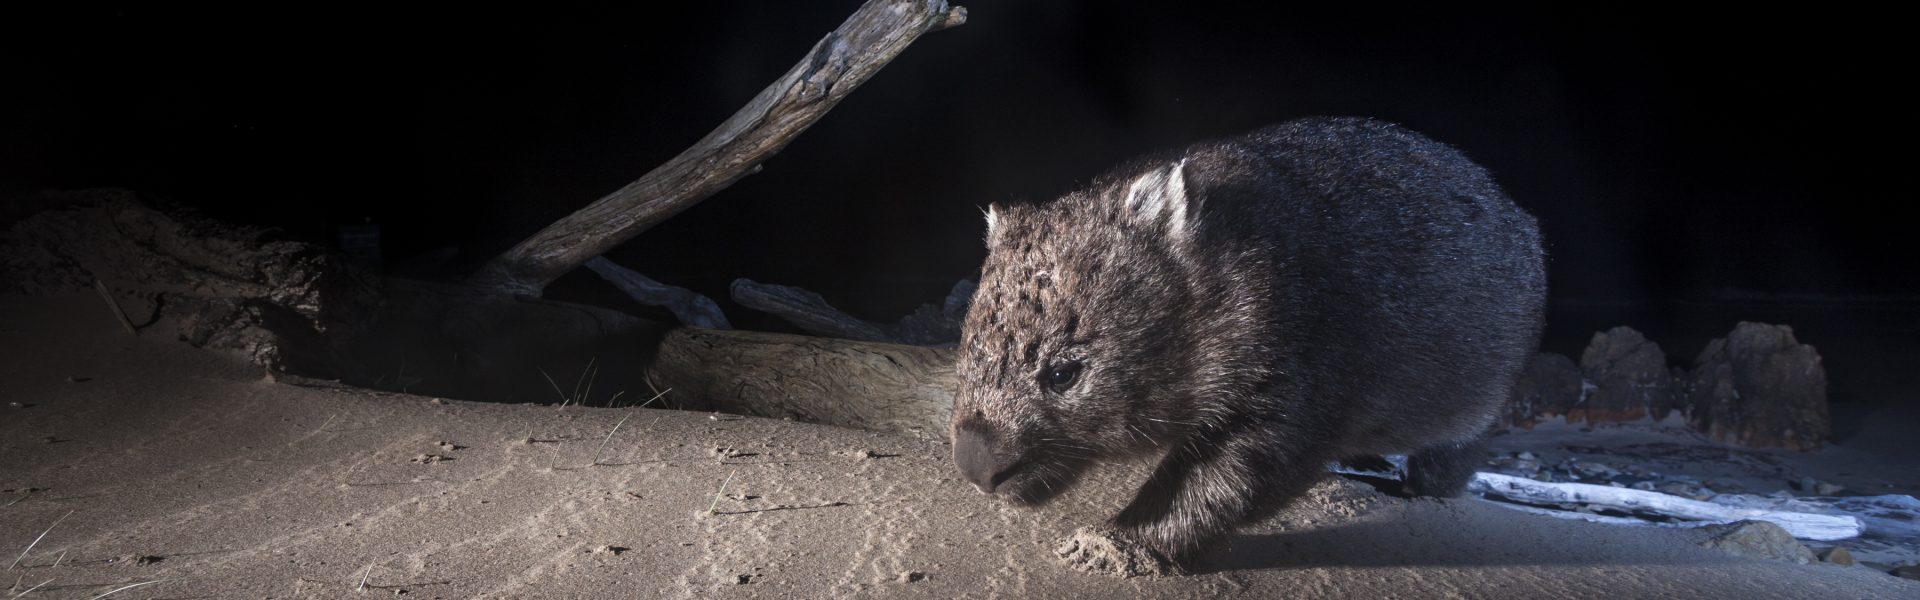
A camera trap consists of a camera (no duh), a motion-detecting sensor, flash, power supply and an SD card. Most camera traps use a Passive Infrared (PIR) motion detector, which is triggered when a target with a different temperature to its background passes in front of the camera. These detectors cannot distinguish between a leaf waving in front of the camera which has a cooler surface than its background environment or a warm and fluffy wombat; they are bound to collect some ’empty’ images. Plants are more likely to cause false triggers when they are close, large or contrast with a background of hot ground or cool sky. Small animals and animals at long range trigger cameras less often because less heat (i.e., infrared radiation) is able to reach the detector.
Most camera trap motion detectors have a number of lenses, each with their own ‘detection area’ or field of view. When a target crosses the boundaries of one or more of these detection areas, the camera will trigger, often with the option to record video or take still images. A good camera has a short trigger delay – the time it takes between an animal waking the camera up, before it determines light levels and opens the shutter. The trigger delay will be specified in the camera manufacturer instructions and can often be altered in the camera settings. A top-spec camera could capture an animal within 0.2 seconds of passing between detection zones.
After taking an image, the camera resets. The time taken to reset varies from camera to camera but can be amazingly quick, particularly when set to take a series of images on ‘hyperfire’ or in burst modes.
Camera traps can be out in the field for weeks or even months depending on the kind of batteries or power supply that is being used. A good camera-trap is dust and rain proof. In Tassie, though, it’s those mischievous possums and the odd hungry devil that we have to worry about…
For more information, read How camera traps work and how to work them.
Where can I buy a camera-trap, for how much, and what model should I get?
Good questions! The range of cameras these days can be overwhelming, even for researchers who use them all the time.
Most people purchase their camera traps online. But be careful, there are some dodgy dealers out there when it comes to selling tech. At the Tasmanian Land Conservancy, we do have some recommendations regarding reputable suppliers, camera models and brands. These are often shared in the Land for Wildlife & WildTracker newsletter and at TLC events. Additionally, by registering your interest in WildTracker and associated communications, you’ll receive a discount code to help with your purchase.
Camera prices can range from $100 to over $800. With increasing price, image quality and trigger speed also tend to increase. Interestingly, some studies have found that lower-cost cameras can detect just as many animals as expensive ones — sometimes even more! The main differences often lie in build quality and lifespan.
If your purpose is simply to know what lives somewhere, high resolution images aren’t always necessary. Certainly, megapixels aren’t all that meaningful when purchasing a camera-trap and are almost always inflated by manufacturers. The best way to assess a cameras photo clarity is by viewing the photos it takes.
We typically recommend using a wide-angle camera. These are better for capturing wildlife up close to the camera and a few studies have shown them to more successfully detect species. Part of this is simply due to them sampling a larger area (capturing more of the scene). One potential downside is that wide-angle cameras might also have a higher false-positive rate, as there is potential for more movement (e.g., caused by vegetation) to trigger them.
Other features to look for:
- Opt for models with as few moving parts as possible (less to go wrong!).
- Avoid those with rubber plugs and stoppers that can be pulled out by inquisitive creatures (possums!) and lead to water damage.
- Ensure a sturdy strap or way of fastening the camera to a tree, stake or fencepost.
- Consider how often you are likely to check your camera and what battery capacity you need (if not going solar).
Where can I setup my camera?
Anywhere you like, so long as it is on your property, or you have permission from the property owner. In order to keep your camera safe from theft, we advise against deploying them near to property boundaries.
If you are working to improve habitat for wildlife anywhere on your property, perhaps through revegetation or weeding, we encourage you to monitor your efforts using a camera trap. Hopefully you will have some new residents.
You might look for sites where there are already signs of animal use such as wombat trails or devil latrines. Water sources can also be a good place to monitor and are often a social hang-out for many animals.
How should I position my camera-trap to maximise the chances of capturing wildlife?
Once you’ve chosen a camera site, look for something to attach the camera to such as a tree or fence post. If possums are interfering with your camera, consider using a star picket placed further away from vegetation.
Secure the camera to the tree or post using the mounting strap. Double-check that the strap is tight and out of the camera’s field of view to avoid thousands of photos of it flapping in the breeze. As for camera height, we suggest 50-120 cm above ground level but if you are targeting a particular species, try aligning the camera at the animal’s “shoulder height”.
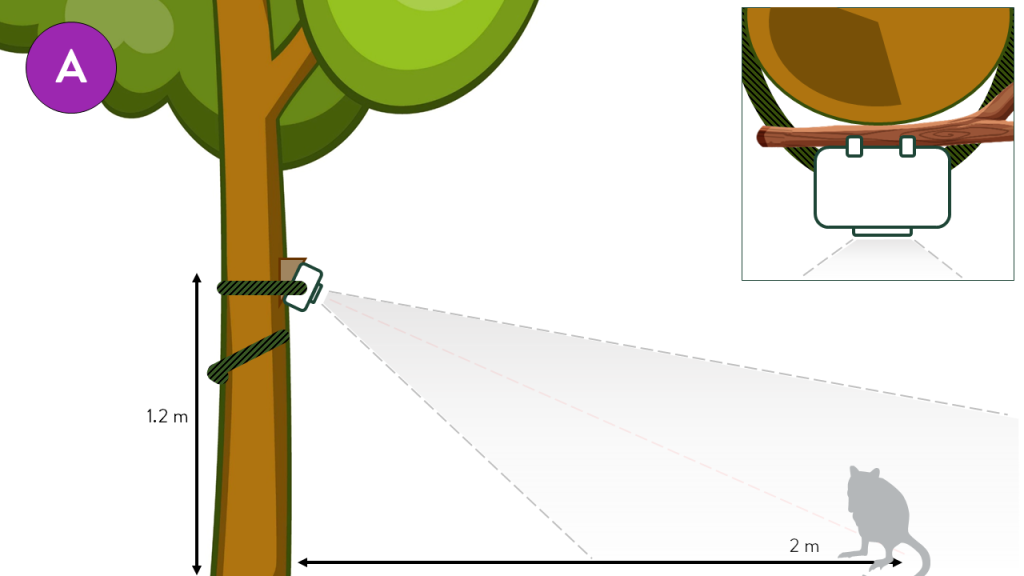
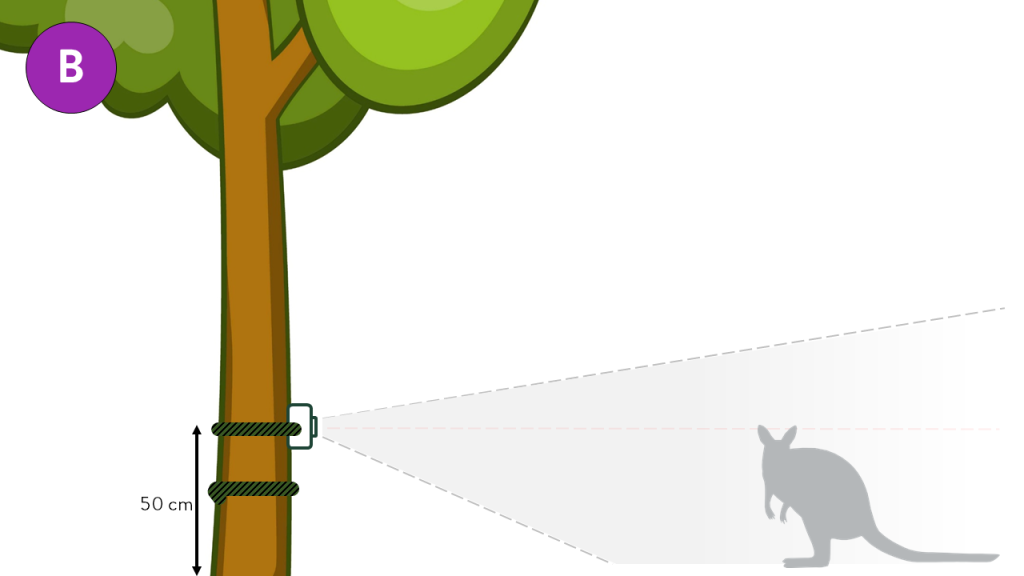
There are a couple of setups to consider:
A) To reduce the risk of devils chewing on your camera and interference from other animals, place the camera higher and angle it downward. Use a stick, rock or wooden wedge between the back of the camera and the tree/post to achieve the desired angle (the bigger the stick the further the camera will point towards the ground).
B) Position the camera lower and parallel to the ground for more eye-level wildlife shots. This can be particularly effective when targeting smaller species. However, cameras closer to the ground are more likely to be tampered with, potentially shifting their aim or knocking them over.
Whichever setup you choose, ensure the camera is firmly secured to prevent movement caused by animals or strong winds.
Trim vegetation in front of the camera that is likely to sway in the wind, especially tall grass. You don’t want the memory card filled with photos of plants before nightfall!
If you like, you can pour some fish oil on the ground approximately 2-3 m horizontal distance from the camera, preferably over a stone or bare earth. Pouring the oil in a circle may encourage animals to show the camera all sides of their body while investigating the scent. This can help to identify individual animals of some species (e.g., quolls and cats).
To check that the camera is pointing where you want it to, open the camera case and move the switch to ‘setup’. Close it again, and walk in front of the camera. When it detects your movement, the light on the front will flash red. Adjust the camera position if necessary. Set the switch to the ‘on’ position, close the case and walk away.
Should I use bait to attract animals to my camera?
By signing up as a participant of WildTracker you must agree to only use a scent lure, such as fish oil, in our Terms of Use. You should not place a physical bait to attract animals.
By “physical bait”, we mean that there should be no accumulation of material or carcass remnants that might attract one or more animals to the site for long periods of time. There should be no inaccessible bait, nor should animals be able to carry any bait item away from the site.
If you ignore this advice, then you may be in breach of the Tasmanian Animal Welfare Act 1993. For more information, see the Tasmanian Department of Natural Resources and Environment website.
What camera settings should I use (e.g., image size, sensitivity, interval and capture number)?
It’s a trade-off. Higher resolution images will use more space on your camera card but may make for prettier photos. Remember, though, that the advertised megapixels for wildlife cameras can be misleading. Most camera companies will use software to artificially increase the number of megapixels through a process called interpolation, but this has no effect on native resolution. If your camera has the option to change the number of megapixels under settings, test the different levels out and compare the results. During the upload process, WildTracker will shrink down the size of your image files so that loading times are not prohibitive.
If you find you keep filling your SD card with lovely pictures of grass blowing in the wind, think about lowering the sensitivity of the cameras trigger.
The interval and capture number are up to you. At the Tasmanian Land Conservancy, we set cameras to take three images each time they are triggered with a 30 second delay between triggers. You might like to do the same.
Does WildTracker work with photos from any camera trap?
Yes, image files from any kind of camera will be compatible.
Will WildTracker accept videos recorded by a camera trap?
We understand that videos can be both entertaining and valuable for honing your identification skills. However, WildTracker currently does not support video files. Many modern cameras offer a “PIC + Video” mode, allowing you to capture both still photos and videos with each trigger. If you choose this option, keep in mind it will require more storage space on the SD card. Before uploading to WildTracker, you’ll need to separate the image files from the videos.
How often should I check my camera?
To ensure data consistency and maximise its value, we ask that you leave your camera in the field for one month. Research shows that 4–5 weeks is generally sufficient to capture most species present at a site, often with something new popping up in the final days. Charge the batteries before deploying your camera. A set of 12 batteries should last the full month, but if your camera uses fewer than 12, check it every two weeks to ensure it’s still operating. A 32GB SD card should hold a month’s worth of photos. If you’re using a smaller card, you may need to check it during the month to ensure it hasn’t filled up.
While it’s tempting to check your SD card early, try to resist. If you must, avoid removing images or swapping the card, as this can create duplicate file names and lead to confusion when uploading to WildTracker.
At the end of the month, upload all photos from the survey at once to keep them stored together in a single survey. After completing your first month-long survey, you’ll have a better sense of whether adjustments to card or battery checks are needed next time.
Oh no, my camera disappeared!
Unfortunately, cameras are sometimes stolen or intentionally damaged by trespassers, either for the value of the camera or to remove evidence of trespass (the kinder criminals simply take the SD card). Should you have one of our WildTracker cameras go missing, please contact wildtracker@tasland.org.au immediately.
To prevent future theft, you might consider the addition of a camera security box. Many companies sell these lockable steel enclosures but be sure to find the right fit for your camera model. There are also other more creative options on the market used to disguise cameras so that they blend in with more urban environments or particular vegetation types.
SD Memory Cards
How big does the SD card need to be?
This does depend on how often you will check the camera. We recommend a 32GB card which should have plenty of space for a full month of data collection (unless you have a particularly narcissistic wallaby).
How do I get my photos off the camera and into WildTracker?
The process for transferring photos may vary depending on your computer:
- Using an SD card reader: Many computers have a built-in SD card slot. Simply insert the card from your camera, and a window should open displaying your image files. Drag and drop these files into the Upload Photos section of WildTracker.
- External SD card readers: If your computer doesn’t have an SD card slot, you may need to purchase an external SD card reader that connects via USB.
- Direct camera connection: Most cameras come with a USB cable, allowing you to connect the camera directly to your computer and transfer files without removing the SD card at all. We now include these cables with all WildTracker camera packs available for loan.
If you are still having trouble, we suggest visiting your local library for help. If you know any young techy types, then demand that they help you for the sake of science.
Creating a Survey Site
I created a survey site in the wrong location – can I fix it?
Yes, you can. On the Overview tab on your property dashboard, click on a survey point on the map. The dot will change from black to green when selected. A window next to the map will display the site name and an Edit Site button.
Click Edit Site to return to the Create a Site page, where you can update the GPS coordinates. Remember to include the negative symbol (−) for latitude to indicate the location is south of the equator. Omitting this could place your site in the Sea of Japan! Alternatively, use the marker tool in the upper‑right corner of the map box; clicking anywhere on the map will automatically populate the correct coordinates.
Once the location is correct, click Update Site. You’ll be taken to the next page, where you can upload additional cover photos if needed, otherwise click Done.
Uploading photos
I accidentally uploaded photos including people, can I delete them?
Stickybeak will automatically delete any photos containing only humans. However, if a human appears alongside an animal – like a pet dog or cat – the system will retain these for classifying later.
If you would like a photo removed from WildTracker please contact wildtracker@tasland.org.au with the relevant survey site, number and photo number.
Should I upload all photos, only ones with animals, or just the ones with animals I find interesting?
We would like you to upload all the photos that you collect.
Once uploaded, Stickybeak will process your photos, automatically removing those that don’t contain animals (or objects it thinks might be animals) as well as any photos of humans. This means there is no need to double-handle files by deleting blank photos yourself.
To make the data as useful as possible, we need to know both where animals are and where they aren’t. It’s important to include even the more common species you record, like possums, or feral animals. While it might be tempting to only upload photos of animals you find exciting, this can lead to a skewed view of animal distributions in our data.
Some of my photos did not upload.
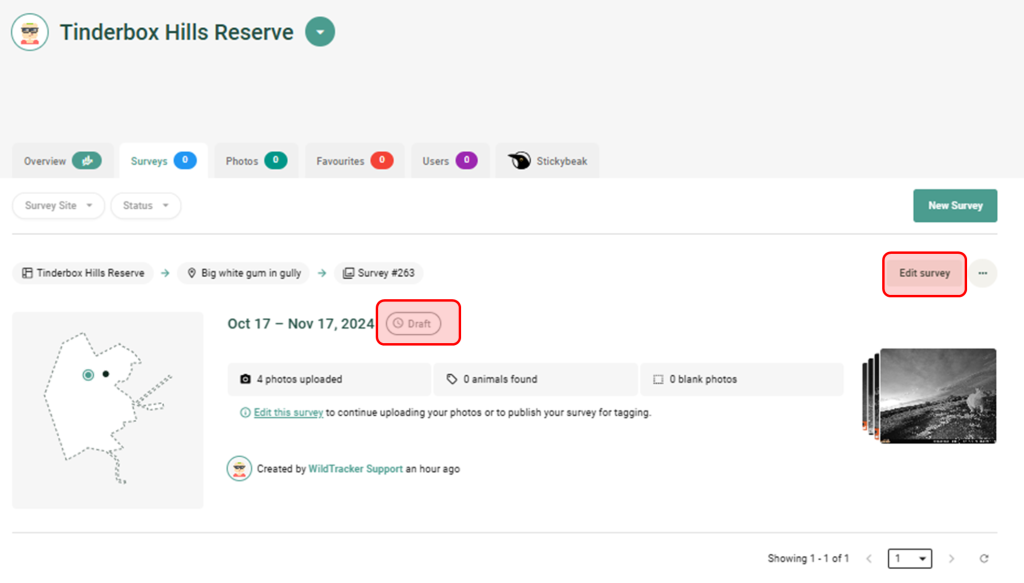
The most common reason for upload failures is an interrupted internet connection. Any photos that fail to upload will appear in an orange box like the example below, and you’ll have three options:
- View images: Look for potential problems like corrupt files or unusual filenames. Files not created by a camera trap, such as screenshots, can sometimes cause errors because they lack key metadata, like the date the image was taken. To minimise errors, try to upload the original, unaltered image files from your camera trap. Avoid using screenshots or images edited with third-party software (e.g., Photoshop).
- Discard images: Delete the failed images from the upload.
- Re-upload images: Locate the failed images in your file browser and try uploading them again.
If lots of photos fail to upload and you can’t address this immediately, the survey will be saved as a Draft under the Surveys tab. You can resume the upload later by clicking the Edit Survey button. Surveys are finalised and become read-only only when you click the Publish button.
Can I partially upload photos to a survey and return later to add more?
For example, if you have two weeks of photos ready to upload but plan to record another two weeks’ worth from the same location:
- Create a new survey and upload your first batch of photos when prompted (Step 2).
- Instead of proceeding to Step 3 and clicking Publish, simply leave the webpage.
- When you return to the Surveys tab, the survey will be saved as a Draft. Click the Edit Survey button whenever you’re ready to add the remaining photos.
To avoid errors, ensure that the photos in each batch have distinct file names (e.g., SYE001, SYE002, etc.). Duplicate file names can cause upload issues. A quick fix is to copy one set of files into the same folder; your computer will automatically add a “- Copy” suffix to the duplicates, making them unique and ready to upload.
Stickybeak
What is Stickybeak and how does it work?
Stickybeak is WildTracker’s artificial intelligence infrastructure which will automatically remove blank camera images, detect potential animals in your photos, and classify them by species. Learn more about Stickybeak here.
How do I process photos using Stickybeak?
Stickybeak will automatically begin processing photos that you upload. If no other user has uploaded photos on the same day, it might take a little while (a few minutes) for Stickybeak to wake up (the server rests to minimise running costs). If you have a few hundred or thousand photos, you’ll notice that Stickybeak will have already processed some of your photos after the upload stage is complete.
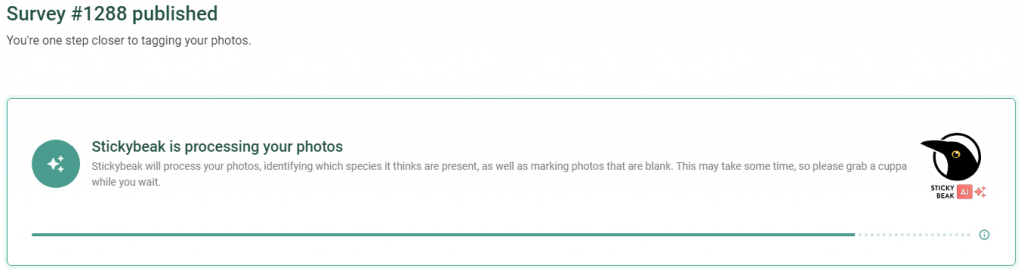
How long will Stickybeak take to process my photos?
Photo processing with Stickybeak begins as soon as images are uploaded to a survey, even while it’s in the Draft stage. You don’t need to keep WildTracker open, stay connected to the internet, or leave your computer running for Stickybeak to continue processing. Surveys undergoing processing will display the Processing icon next to them in the surveys tab.
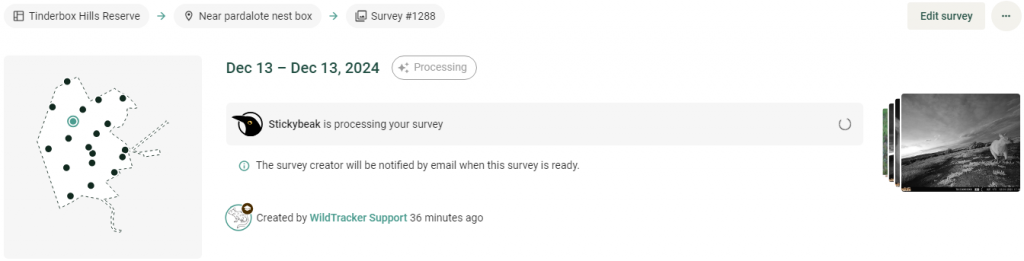
Once Stickybeak finishes doing its thing, the survey creator and the property account owner in WildTracker will receive an email notification.
What species does Stickybeak know?
Stickybeak is currently powered by a classification model from the University of Tasmania that recognises 96 species (updated Feb 2026) or species classes (e.g. invertebrates, snakes).
Most wildlife commonly captured by camera traps in Tasmania is included, but some species (primarily birds) are not yet part of the model. When you are tagging photos, any animal name that has an asterisk * indicates that Stickybeak does not yet recognise that species. These tags are especially valuable, because they may be used to help train future versions of the model.
Stickybeak got it wrong..!
Like all AI, Stickybeak isn’t perfect — one reason we ask you, a human, to accept or reject Stickybeak’s tags is to help improve its accuracy. Some suggestions may be wildly inaccurate — a fur seal in my backyard?! We encourage you to take these classifications with a giggle, not a grumble.
Stickybeak’s limitations:
- No sense of context: Stickybeak doesn’t know whether your camera is at the beach or in the Central Highlands. If only part of an animal is in the frame, Stickybeak might struggle. But you, clever as you are, can check the photos before and after to fill in the gaps.
- No sense of scale: Stickybeak treats all objects equally, shrinking or stretching them into 600 x 600 pixel squares. A wombat might look the same size as an Antechinus in its eyes.
- Limited knowledge: Stickybeak only knows what it’s been taught. The current model is missing some Tasmanian species from its repertoire. For example, many of our birds are, ironically, unknown to Stickybeak, so it’s likely to misidentify them.
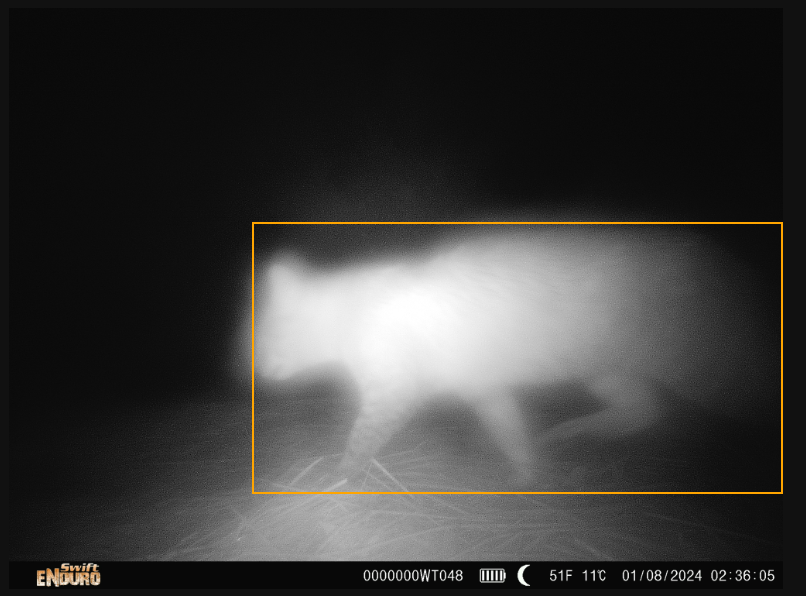
- Fog and blur: In some photos, the outline of an animal may be fuzzy (example below). We’ve noticed that, in these cases, Stickybeak leans towards assigning the Unsure tag in caution. This may be despite us humans being confident in assigning a species.
Stickybeak provides confidence estimates for its predictions. If the confidence level is low (e.g. < 50%) for either being an animal or the predicted species, then there is a good chance the classification is incorrect. We find that when there are no animals in a photo, Stickybeak is more likely to find other interesting objects like tree guards, soccer balls or fence posts. In these cases, you can tell it that these are not animals by selecting the Not an animal tag and the related bounding box will be removed.
If you know what the animal in your photo is but don’t see an appropriate option under the tags list, we encourage you to add a comment to the photo that will help us find these later. Or, if you think we’re missing an essential tag, email us at wildtracker@tasland.org.au to request new additions.
Stickybeak missed an animal, what should I do?
Stickybeak, specifically the MegaDetector component, may occasionally miss animals, especially if they are partially obscured, blend into the background, or are only partially visible within the cameras field of view. Stickybeak might also miss youngsters, like joeys in the pouch or clinging to Mum’s back. However, Stickybeak is typically too sensitive, often detecting non-species objects. Fine-tuning these models is a delicate balance!
If you notice an animal without a bounding box, there isn’t currently a way to draw your own box. However, you can add a comment to the photo to alert us about the missed animals, which will assist us when reviewing WildTracker data.
Classifying photos
How do I do this exactly?
Once a survey is published and processing is complete, it’s time to review Stickybeak’s tags and classify the species in your photos. Surveys that need classification are labelled with a Needs Classification tooltip under the Surveys tab.
- Click the Edit Survey button next to the survey you want to classify.
- Click the Classifier button to open the classification window.
- Click Start Tagging at the top-left corner.
- Stickybeak uses bounding boxes to highlight potential animals. Hover over a box to dim the background, making the subject clearer. Click within the bounding box to assign a species tag.
- A list of available species will appear. Select a species name using the mouse or use the corresponding hotkey on your keyboard (e.g., press W for Bennett’s Wallaby).
How do I intepret Stickybeak tags?
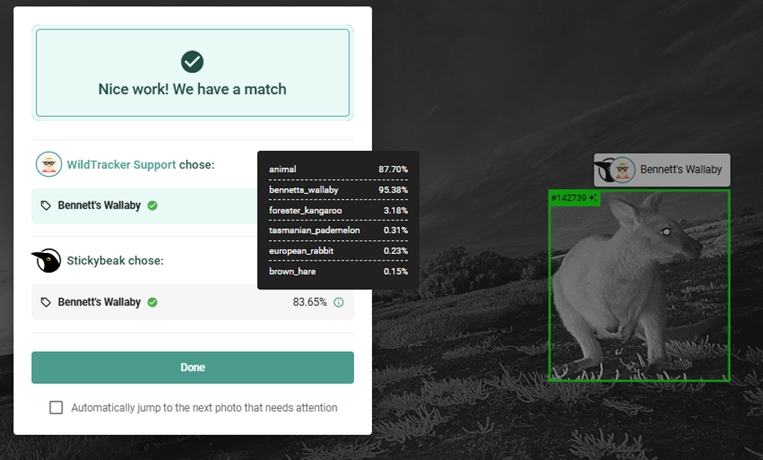
In this photo, Stickybeak chose the Bennett’s Wallaby tag and the user agrees. Hovering over the information (i) button with your mouse displays a pop-up window with a breakdown of how Stickybeak came to this decision. The first row indicates how confident the AI model was that this bounding box correctly identified an animal being present in the first instance – 87.70%. The second row indicates the highest ranking classification by Stickybeak. In this case, Stickybeak is 95.38% sure that the animal in the box is a wallaby. The second ranked classification is for the Forester at 3.18%, and so on. In the main window, the combined confidence (animal + wallaby) is listed as 83.65%.
If you’re unsure what species an animal in your photo is, then checking out the raw confidence and suggested tags given by Stickybeak may help give you an indication.
When confidence levels are low or are similar for multiple species (often the case for birds), we encourage you to be extra cautious in accepting Stickybeak tags.
What are Conflicts?
If your tag does not match Stickybeak’s prediction, the bounding box will turn orange, and a message will indicate the mismatch giving you three options. These mismatches are referred to as Conflicts.
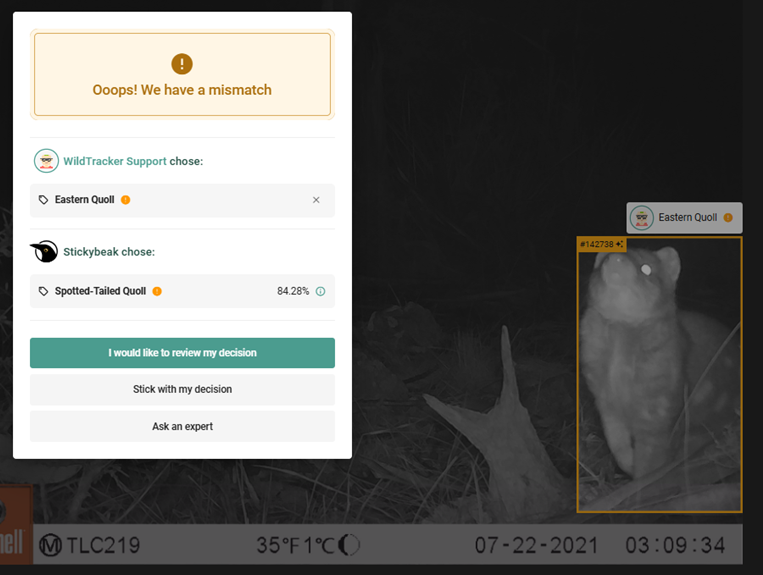
Select one of three options:
- I would like to review my decision: Remove your tag and reclassify based on Stickybeak’s suggestion.
- Stick with my decision: Confirm your tag if you’re confident Stickybeak is incorrect.
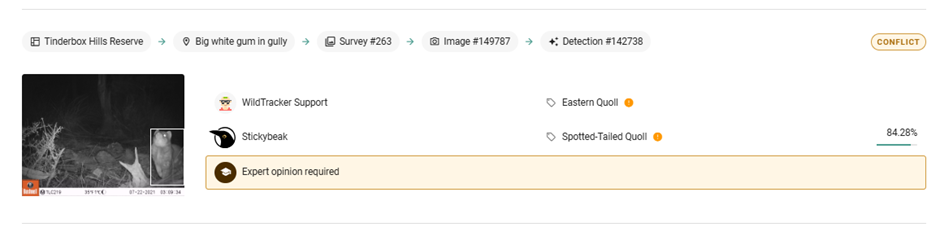
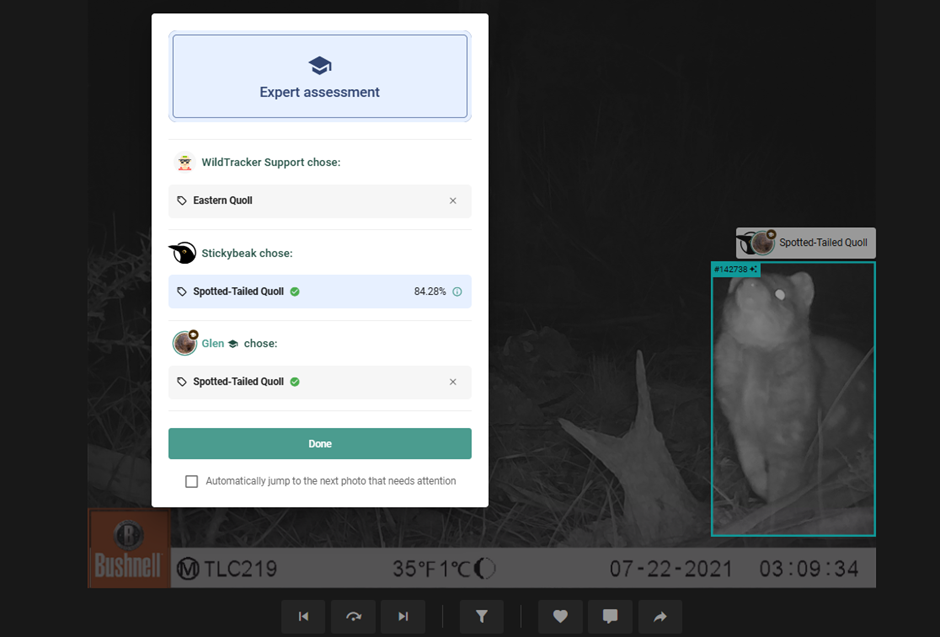
- Ask an expert: Retain both tags and send the photo to an ecologist at the Tasmanian Land Conservancy or trained volunteer for review.
If sent to an expert, your photo will be added to a conflict resolution list. Once reviewed, the bounding box will turn blue. The expert’s tag will override both Stickybeak’s suggestion and your tag, if different.
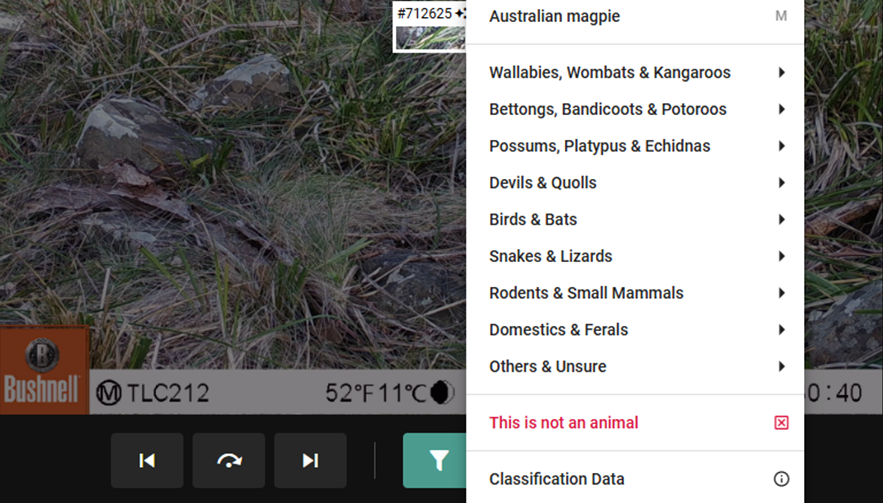
Stickybeak detected something that isn’t an animal. What do I do?
We find that when there are no animals in a photo, Stickybeak is more likely to find other interesting objects like tree guards, soccer balls or fence posts. In these cases, select the This is not an animal tag in the classifier. A message will appear, asking if you’re sure you want to remove the detection. By clicking Remove, the bounding box around the object will be deleted, and the photo preview will display a white cross, indicating that the photo is now “empty”.
What if I can’t identify an animal captured on my camera?
That’s ok. We understand this can be difficult and not every image will provide enough information to confidently tag it with the species present. If, after checking out our Wildlife ID guide, considering Stickybeaks suggestions, and consulting with friends or family you are still unable to identify the species present, you can tag the image as Unsure. This will help us better understand which species participants may be struggling with the most and under what circumstances.
Remember, if there is a mismatch between your selected tag and Stickybeak’s suggestion, you’ll still have the option to flag the photo for expert review, even if you choose the Unsure tag.
What if there are multiple species or individual animals in a single image?
We want you to assign a species tag to every bounding box that Stickybeak draws on your photo. If any of the boxes do not include an animal, use the This is not an animal tag to delete the false detection. If there are multiple overlapping boxes, see the question below. If there are animals in the image that don’t have a bounding box around them, meaning Stickybeak missed them, there isn’t currently a way to draw your own box. However, you can add a comment to the photo to let us know about the missed animals. This will help us when reviewing WildTracker data.
How do I assign tags to overlapping boxes identified by Stickybeak?
In some cases, Stickybeak may draw boxes around different parts of the same animal or over a joey in the pouch of another animal, causing the boxes to overlap. This can make it tricky to assign a tag—how do you know which box to select, and how can you access the “hidden” box?
This is where the Auto Navigate feature becomes essential.
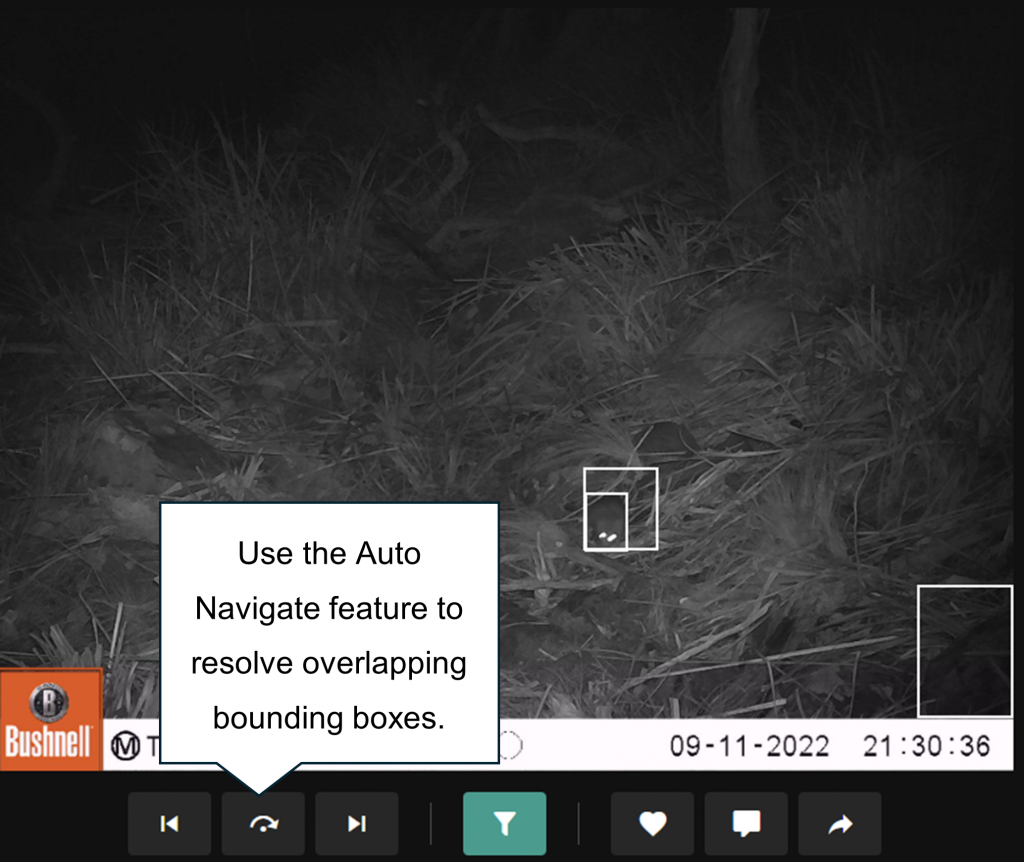
- Click the Auto Navigate button in the bottom menu.
- Tag a box by clicking inside it, selecting a species, and finalising the match (e.g., by choosing Stick with my decision or Ask an expert).
- The system will automatically highlight the next untagged box, avoiding the challenge of manually selecting boxes that are hidden beneath others.
Auto Navigate is also helpful for finding untagged boxes that may be difficult to spot, such as:
- Tiny boxes far in the background or on the horizon.
- Boxes mistakenly drawn around text or symbols from the camera stamp.
By activating Auto Navigate, the system will locate and highlight these boxes for you. You can turn the feature off at any time by clicking the button again.
Auto Navigate can speed up the tagging process, especially when dealing with large volumes of photos. However, be mindful—it’s easy to fall into a repetitive tagging pattern and accidentally assign the same tag to multiple boxes incorrectly. Stay alert to avoid misattributing species.
I’ve spotted a thylacine!
- Look again.
- How much have you had to drink?
- Are you sure it’s not a pademelon?
- Yeah nah.
How can I make the photo bigger to identify animals more easily?
The size of the photo in the classifier window depends on your screen size. If possible, connecting your laptop to a larger monitor via HDMI will help. But if that’s not an option, here are a couple of other suggestions:
- Click the Filter button (a green-highlighted funnel icon) at the bottom of the screen. This hides one row of information above the photo, giving it more space.
- Adjust the thumbnail panel size. Click the “Toggle smaller thumbnails” button, which looks like a square with two mountain-like shapes inside it. This reduces the size of the thumbnail previews. Then, hover over the left-side scrollbar until your cursor changes to a double-headed arrow (<->). Click and drag the bar left to shrink the preview column, enlarging the main photo.
- Click within the photo to zoom in. When you hover over the image, your cursor will change to a magnifying glass. Clicking will enlarge the selected area – especially useful for spotting small animals like rodents.
It’s the 21st century, couldn’t a robot do all the image tagging?
Not entirely. While many research institutions are developing machine learning algorithms to process camera trap imagery, no system is flawless. The models Stickybeak uses were developed by researchers at the University of Tasmania, and while they will improve over time, human input remains essential.
Your feedback – accepting or rejecting Stickybeak’s tags in WildTracker – plays a critical role. This information will be periodically fed back into the system to refine and enhance its accuracy. Remember, AI is only as effective as the data and guidance us humans provide.
Can my family, friends, neighbours or colleagues help me tag my photos?
The more the merrier, but please make sure that they use their own WildTracker login. You can invite a new user to your property and either allow them to ‘create surveys’ or limit them to ‘assess surveys’. It’s up to you.
The key here is that if you are tagging images, we want you logged in. If your friend is tagging images, we want them logged in.
What happens to the data I collect and the images I tag?
SCIENCE. We have lots of burning ecological questions at the Tasmanian Land Conservancy that your data will help answer. Scientific results that stem from WildTracker will be shared with participants via email, newsletters and workshops once we have them.
Your de-identified (anonymous) observation data may also be shared with other research institutions (e.g., University of Tasmania) and biodiversity databases such as the Atlas of Living Australia or the Tasmanian Natural Values Atlas. We want to squeeze every last drop of usefulness out of the citizen science data you collect.
Can I share photos that I upload to WildTracker?
You must first ‘favourite’ a photo before you can share it. You can do so by clicking the love heart button beneath an image. Clicking the share button – an arrow icon in the top left of the photo thumbnail – will display a unique web link. You can send this link to anyone, whether they are registered with WildTracker or not, and they will be able to open the image in their web browser.
Data migration and updates
What happened to photos that I had already tagged during the Stickybeak update (December 2024)?
- Matching Tags – If Stickybeak identified the same number of objects in a photo as there were tags provided by you, the objects were paired based on their confidence levels. For example, if Stickybeak detected a pademelon and you had tagged it as such, the two were matched.
- Conflicts – If Stickybeak identified an animal, but the tags you provided didn’t match (creating a conflict), those photos were added to a review list. Ecologists at the Tasmanian Land Conservancy or trained volunteers will review these photos in the coming months (2025).
- Extra Detections – If Stickybeak detected more animals than the number of tags you provided, the additional detections remain untagged by you, with only the Stickybeak tag retained.
- Orphan Tags: If you assigned more tags than Stickybeak detected, the extra tags are considered “orphan tags.” Photos with orphan tags have also been added to the review list to be addressed by others, so there’s no need for you to worry about them.
Importantly, the tags you previously assigned to photos remain invaluable. They help us understand where Stickybeak’s predictions may be incorrect.
Other questions
My camera didn’t capture any animals, what do I do?
That’s a shame. This may indicate that no animals passed in front of your camera. More likely, though, is that your camera is set up incorrectly or is faulty.
Make sure that the camera is pointing in the right direction by using the ‘test’ function. Typically, a red flashing light will indicate movement within the camera’s detection range.
Did you turn the camera on? Trust us, it is very easy to walk away without remembering to flick that power switch up!
Try the camera at a new site and give it a wave before you walk away. Alternatively, set the camera up in a dark room at home and jump around in front of it. If there are no selfies on your SD card when you check, then this is evidence of something more problematic afoot and you may need to contact the camera manufacturer or supplier.
Are the locations of threatened species made public?
Camera trap data, and biodiversity observations more broadly, should be made freely available and shared widely to enable its use in conservation decision making, education and research for the benefit of wildlife. Where the release of observation data will have the opposite effect, however, access to detailed information may need to be controlled. This is particularly the case when considering location data of threatened species.
Currently there are only three threatened species in Tasmania for which location information is formally restricted, all of which are plants. Notwithstanding that there may be no formal restrictions on location information, we may, in our sole discretion, strip or obscure geographic location data associated with tagged images at any time and for any species to safeguard against potential harm to at-risk wildlife.
I’m worried about my privacy…
We take seriously the protection of your privacy. Please read our Privacy Policy to see what information we may collect about you and the observation data that you provide, and how this information is managed. If you have any concerns, please don’t hesitate to contact us at wildtracker@tasland.org.au.
Can anyone on WildTracker see where I put my camera?
No. Only you and the users that you invite to your property can see where you put your camera. Any maps that may be produced to indicate the location of WildTracker users will be at a scale such that it is impossible to locate properties or camera sites with any level of accuracy.
Can I delete my WildTracker account?
Yes. Send your request to wildtracker@tasland.org.au. When we delete your account, the observation data that you have provided will remain part of our database but will be stripped of any personal identifying information.
I’m a researcher/policy maker/wildlife manager, how can I access the data?
You may request data access via wildtracker@tasland.org.au. Please tell us what kind of data you’d like and why in your email.
We cannot guarantee that access will be provided but believe strongly in the principles of open science.
I’m not a citizen, please don’t call it citizen science…
We understand that the term ‘citizen science’ may be misleading or a barrier to inclusion in some parts of the world. Here at the Tasmanian Land Conservancy, we like to think of citizen scientists as being citizens of science rather than of any particular nationality.
The Australian Citizen Science Association defines citizen science as: public participation and collaboration in scientific research with the aim to increase scientific knowledge.
Ugh, my question isn’t here…
Send us an email, wildtracker@tasland.org.au and we’ll do our best to answer your query.